


Calibration Temperature (QUV)
To obtain accurate temperature data, the blackboard temperature sensor should be calibrated every six months in accordance with ASTM E220.
Tools required for calibrating the blackboard temperature sensor:
● Calibration reference thermometer
● Phillips screwdriver
● Insulated container
● Hot water
Q-Lab offers an optional temperature calibration kit (U-41085-K), which includes a user-friendly insulated container.
Calibration procedure:
1.If the equipment is running a test, press the STOP button or click the STOP icon on the status screen to pause the test.
.png)
.png)
2.The blackboard temperature plate is installed in the sample area on the front of the machine.
.png)
3.Loosen the two screws fixing the sensor cover and carefully pull the temperature sensor out of the panel.
.png)
.png)
4.Temperature calibration method for keypad-version QUV:
●Place the machine's temperature sensor and the calibration thermometer together in a thermos cup. The water temperature in the cup should be the maximum temperature during testing, and then wait for more than ten minutes to allow the sensor temperature to stabilize.
.png)
.png)
● Press the Program key on the QUV control panel keyboard, select P4, and rewrite the temperature of the machine's temperature sensor based on the calibration reference thermometer.
.png)
.png)
● Press the Enter key to save after completion.
.png)
.png)
5.Temperature calibration method for touchscreen-version QUV:
●Place the machine's temperature sensor and the calibration thermometer together in a thermos cup. The water temperature in the cup should be the maximum temperature during testing, and then wait for more than ten minutes to allow the sensor temperature to stabilize.
.png)
.png)
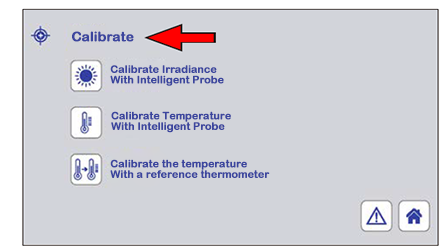
● Locate and enter the calibration menu, as shown in the figure below:
.png)
.png)
● Click on the reference thermometer text box and enter the corresponding temperature with the keyboard.
.png)
.png)
● Click the calibration icon, and after calibration is completed, return to the calibration menu.
.png)
6.Calibration method for UC101 intelligent sensor:
●Locate the UC101/BP or UC101/IBP intelligent sensor assembly, remove a sample rack, and place the intelligent sensor assembly on the left side of the machine sensor.

.png)
● Insert the intelligent sensor into the USB port of the machine, run the machine, and wait for the temperature to stabilize.
.png)
.png)
● When the temperature stabilizes and stops fluctuating, click the calibration icon to complete the calibration.
.png)
.png)
The above operations are described in detail with step-by-step instructions and guidance in the product manual provided with the machine. For the product manual or any other assistance, please contact us!